
Pikmin Crochet Patterns
Free crochet pattern for your favorite classic Pikmin. Crochet a red or yellow Pikmin amigurumi! Sign up for my email newsletter and be the first to know when more amigurumi Pikmin patterns drop!

Hi there!
The first game I ever played for the Nintendo GameCube was Pikmin and it was so much fun. I still play it to this day! In honor of my first video game, I decided to design an amigurumi Pikmin pattern.
Use this free amigurumi pattern to crochet your own adorable Pikmin. Currently, the crochet pattern is only available to make the red & yellow versions. More colors are on the way!
Clicking on certain links may result in a small commission for me at no extra cost to you. Money generated from this allows me to continue to design and post cute amigurumi patterns for you all!
Clicking on certain links may result in a small commission for me at no extra cost to you. Money generated from this allows me to continue to design and post cute amigurumi patterns for you all!
Red Pikmin

Red Pikmin is strong in numbers and resistant to fire. These are the first species you encounter in the game on Day 1. Their distinguishable feature is their pointy nose. The Red Pikmin plushie is completely poseable as pipe cleaners are used in the limbs. Because of this, I’ve decided that this crochet pattern requires an expert skill level. The pattern will be difficult for beginners, but you are welcome to try it! The finished red Pikmin amigurumi is approximately 12" tall by 4” wide.


What You’ll Need:
1 198g ball of Red Heart Super Saver in Hot Red
Stuffing
Stitch Marker
White/Black Felt Sheets
Fabric Glue
Pipe Cleaners
Darning Needle
Abbreviations:
ch=chain
sc=single crochet
hdc=half double crochet
dc=double crochet
trbl=treble crochet
ss=slip stitch
sts(s)=stitch(es)
F/O=fasten off
inc=increase (or 2 sc in 1 stitch)
dec=decrease (or sc2tog)
Gauge:
20 sts x 20 rows = 4” in single crochet
Red Pikmin Pattern:
Head/Body:
The pattern starts at the top of the head and works its way down to the bottom of the body. Made as one piece. Use red.
1. Ch 2. 6 sc in the first ch. (6 sts)
2. 2 sc in each st around. (12 sts)
3. 1 sc, inc. Repeat around. (18 sts)
4. 2 sc, inc. Repeat around. (24 sts)
5. 3 sc, inc. Repeat around. (30 sts)
6. Sc in each st around. (30 sts)
7 - 11. Repeat 6. (30 sts)
12. 3 sc, dec. Repeat around. (24 sts)
13. 2 sc, dec. Repeat around. (18 sts)
14. Sc in each st around. (18 sts)
15 - 21. Repeat 14. (18 sts)
22. 1 sc, inc. Repeat around. (27 sts)
23. Sc in each st around. (27 sts)
24. Repeat 23. (27 sts)
25. 1 sc, dec. (18 sts)
26. Sc in each st around. (18 sts)
27. Dec around.
Ss and F/O. Use the tail to sew up the hole.
Antenna:
Use red.
1. Ch 6. Ss into the first ch to make a loop. (6 sts)
2. Sc in each st around. (6 sts)
3 - 11. Repeat round 2. (6 sts)
Do not stuff the antenna. When possible, insert a pipe cleaner and continue to crochet around it. You can cut the pipe cleaner to fit if necessary.
12. Dec x 1 and sc in the rest of the sts around. (5 sts)
13. Sc in each st around. (5 sts)
14 - 17. Repeat 13. (5 sts)
18. Dec until closed.
F/O. Attach the wide end of the antenna (round 1) to the top of the Pikmin’s head.
Leaf:
Use green.
1. Ch 17. This is your foundation ch.
2. Sc in the 2nd ch from the hook. Sc in the next st. [Sc x 2, dc x 2, dc x 2, trbl x 2]. [Dc x 2, hdc x 2, sc x 2, sc, ss].
3. Repeat row 2 on the other side of the foundation ch.
Ss and F/O. Attach the leaf to the top of the antenna.
Nose:
Use red.
1. Ch 4. Ss into the 1st ch to make a loop. (4 sts)
2 - 3. Sc in each st around. (4 sts)
4. Dec around. (2 sts)
5. Dec.
Ss and F/O. Attach the wide end of the nose (round 1) to the front of the Pikmin’s face.
Arms:
Use red.
1. Ch 2. 6 sc in each st around. (6 sts)
2. Sc in each st around. (6 sts)
3 - 7. Sc in each st around. (6 sts)
Insert a pipe cleaner that you cut to fit and continue to crochet around it.
8. 1 sc, dec. Repeat around. (4 sts)
SS and F/O. Use the tail to sew up the hole. Repeat for the 2nd arm and attach them to the Pikmin’s body.
Legs:
Use red.
1. Ch 2. 6 sc in the first ch. (6 sts)
2. Sc in each st around. (6 sts)
3 - 6. Repeat 2. (6 sts)
Insert your pipe cleaner and cut it to fit.
7. Dec around.
Ss and F/O. Use the tail to sew up the hole. Repeat for the 2nd leg and attach them to the bottom of the Pikmin’s body.
Face:
Use the white and black felt sheet to cut out circles for the Pikmin’s eyes. Use fabric glue to glue the felt together and attach the eyes to Pikmin’s head.
Find the FREE version here. This download is a printable PDF free of ads.
The Red Helper plushie is completely poseable as pipe cleaners are used in the limbs. Because of this, I’ve decided that this crochet pattern requires an expert skill level. The finished amigurumi is approximately 12" tall by 4” wide.
This crochet pattern is inspired by the Red Pikmin from the video game series Pikmin.
❤️ Expert Pattern
❤️ Video Game Plushie
❤️ Written Crochet Tutorial
❤️ Ad Free Download
Crochet pattern designed by Summerbug Crafts. Feel free to sell plushies made using this pattern, but give credit to @summerbugcrafts! 🐞
How to purchase:
✔ Click “PURCHASE”
✔ Enter Your Email
✔ Input Shipping Information
✔ Select Payment
✔ Complete Checkout
Thank you for shopping from Summerbug Crafts! 🐞
Yellow Pikmin
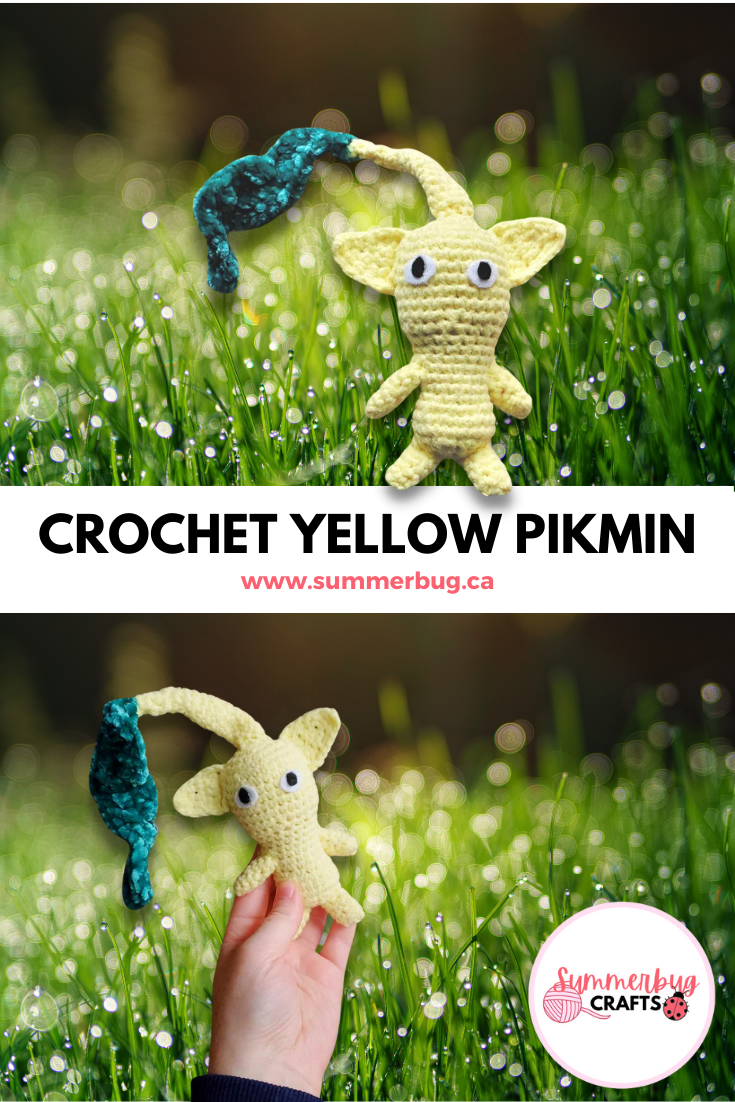
Yellow Pikmin are the second type you discover in the game and arguably the best out of the 3 in the original game. They are resistant to electricity and have an increased throw height due to their elf-like ears, and the ability to carry and throw bomb rocks to take out obstacles. This plushie is completely poseable as pipe cleaners are used in the limbs. Because of this, I’ve decided that this crochet pattern requires an expert skill level. The yellow Pikmin crochet pattern will be difficult for beginners, but you are welcome to try it! The finished yellow Pikmin amigurumi is approximately 11" tall by 4” wide.


What You’ll Need:
1 150g ball of Loops & Threads Baby Rainbow in Lemon
Stuffing
Stitch Marker
White/Black Felt Sheets
Fabric Glue
Pipe Cleaners
Darning Needle
Abbreviations:
ch=chain
sc=single crochet
hdc=half double crochet
dc=double crochet
trbl=treble crochet
ss=slip stitch
sts(s)=stitch(es)
F/O=fasten off
inc=increase (or 2 sc in 1 stitch)
dec=decrease (or sc2tog)
Gauge:
16 sts x 16 rows = 4” in single crochet
Yellow Pikmin Pattern:
Head/Body:
The pattern starts at the top of the head and works its way down to the bottom of the body. Made as one piece. Use yellow.
1. Ch 2. 6 sc in the first ch. (6 sts)
2. 2 sc in each st around. (12 sts)
3. 1 sc, inc. Repeat around. (18 sts)
4. 2 sc, inc. Repeat around. (24 sts)
5. 3 sc, inc. Repeat around. (30 sts)
6. Sc in each st around. (30 sts)
7 - 11. Repeat 6. (30 sts)
12. 3 sc, dec. Repeat around. (24 sts)
13. 2 sc, dec. Repeat around. (18 sts)
14. Sc in each st around. (18 sts)
15 - 21. Repeat 14. (18 sts)
22. 1 sc, inc. Repeat around. (27 sts)
23. Sc in each st around. (27 sts)
24. Repeat 23. (27 sts)
25. 1 sc, dec. (18 sts)
26. Sc in each st around. (18 sts)
27. Dec around.
Ss and F/O. Use the tail to sew up the hole.
Antenna:
Use yellow.
1. Ch 6. Ss into the first ch to make a loop. (6 sts)
2. Sc in each st around. (6 sts)
3 - 11. Repeat round 2. (6 sts)
Do not stuff the antenna. When possible, insert a pipe cleaner and continue to crochet around it. You can cut the pipe cleaner to fit if necessary.
12. Dec x 1 and sc in the rest of the sts around. (5 sts)
13. Sc in each st around. (5 sts)
14 - 17. Repeat 13. (5 sts)
18. Dec until closed.
F/O. Attach the wide end of the antenna (round 1) to the top of the Pikmin’s head.
Leaf:
Use green.
1. Ch 17. This is your foundation ch.
2. Sc in the 2nd ch from the hook. Sc in the next st. [Sc x 2, dc x 2, dc x 2, trbl x 2]. [Dc x 2, hdc x 2, sc x 2, sc, ss].
3. Repeat row 2 on the other side of the foundation ch.
Ss and F/O. Attach the leaf to the top of the antenna.
Ears:
Use yellow. Worked in rows.
1. Ch 7. Sc in the 2nd ch from the crochet hook. Sc in each ch across. (6 sts)
2. Ch 1. Turn. Dec. Sc in each st until the last 2. Dec. (4 sts)
3. Ch 1. Turn. Sc across. (4 sts)
4. Ch 1. Turn. Dec x 2. (2 sts)
5. Ch 1. Turn. Sc across. (2 sts)
6. Ch 1. Turn. Dec.
7. Ch 1. Turn. Sc around the entire ear.
Ss and F/O. Repeat for the second ear.
Arms:
Use yellow.
1. Ch 2. 6 sc in each st around. (6 sts)
2. Sc in each st around. (6 sts)
3 - 7. Sc in each st around. (6 sts)
Insert a pipe cleaner that you cut to fit and continue to crochet around it.
8. 1 sc, dec. Repeat around. (4 sts)
SS and F/O. Use the tail to sew up the hole. Repeat for the 2nd arm and attach them to the Pikmin’s body.
Legs:
Use yellow.
1. Ch 2. 6 sc in the first ch. (6 sts)
2. Sc in each st around. (6 sts)
3 - 6. Repeat 2. (6 sts)
Insert your pipe cleaner and cut it to fit.
7. Dec around.
Ss and F/O. Use the tail to sew up the hole. Repeat for the 2nd leg and attach them to the bottom of the Pikmin’s body.
Face:
Use the white and black felt sheet to cut out circles for the Pikmin’s eyes. Use fabric glue to glue the felt together and attach the eyes to the Pikmin’s head.
I hope you enjoyed my Pikmin crochet patterns. I promise that more amigurumi Pikmin patterns will be available soon! Sign up for my emails at the bottom of the page to be the first to know when a new Pikmin pattern has dropped.
Make sure to tag me on social media when you crochet a Pikmin @summerbugcrafts or #summerbugcrafts!
Don’t forget to save these patterns to Pinterest for later or share it on social media!

You Might Like…

