
Learn To Write Crochet Patterns
Make passive income with your crochet by learning how to write and sell your own patterns. Downloadable template available.

Hi everyone!
Make passive income with your crochet skills by writing crochet patterns! I began writing my crochet patterns shortly after I learned how to crochet, and I realized that the money maker was selling my designs instead of my finished products. How do you sell crochet patterns? All you need to do is download my template. Whether it be amigurumi patterns, garments, or crochet accessory designs you want to sell, this template will work for you.
”But I can sell a cute plushie for $30.00 and only sell a pattern for $5.00 or less. How does that make sense?” You’ll spend all your free time crocheting products to make money. Not to mention dealing with shipping costs and updating your product photos. All your free time will be gone. You will burn out and burn out FAST. Take it from someone who knows.
With crochet patterns, you can put in the same amount of time to design them as it does to make a few plushies. Then you keep making money endlessly afterward without lifting a finger. That means more time to enjoy life!
If you crochet and you’re looking for a way to make some passive income, then this is the way to do it. Sell your crochet patterns! Selling your crochet patterns on Etsy is a great place to start, but digital downloads can be sold on platforms other than Etsy.
Are you ready to get started? Do you want to write crochet patterns to sell? Then download my template to learn how to write crochet patterns today! You’ll get a Canva link for two versions: a PDF you can print off and write on with a pen/pencil if you’re old school and; a Canva template that you can edit and type up your design. You don’t have to pay to use this template on Canva. It can be used with the free version!
Do you creating amazing crochet creations and want to share them with the world? How about making some money on the side with your hobby? Learn how to design and write crochet patterns with my downloadable crochet pattern template.
You’ll receive a copy of a template that can be edited in Canva as well as a plain version you can download as a PDF and print if you prefer to write your crochet designs by hand. You do not need a paid Canva membership to use and download the crochet pattern template. It can be used and edited with the free version.
Preview the Canva template here.
Download to:
✔ Make Passive Income
✔ Make Your Dreams a Reality
✔ Learn to Write Crochet Patterns
Collect your thoughts & ideas with a section for:
📝 Pattern Title
📝 Your Favorite Yarn
📝 Crochet Hooks
📝 Gauge
📝 Pattern Notes
📝 & More!
Make money with crochet today! 💲Check out my helpful blog on how to use each section for success!
Looking to go straight to selling crochet pattern PDF’s? Download my template here.
How to purchase:
✔ Click “PURCHASE”
✔ Enter Your Email
✔ Input Shipping Information
✔ Select Payment
✔ Complete Checkout
Thank you for shopping from Summerbug Crafts! 🐞
Note that this template is meant to write rough drafts of your patterns and give you a solid starting format. It is not for finished PDF versions to sell. This guide will show you how to write a crochet pattern. This is primarily a tool for learning. If you’re interested in skipping this step and want to begin selling, purchase my “Sell Your Crochet Pattern PDF” Canva Template.
This template is split into sections because writing patterns has a format just like any other written document. However, keep in mind that there is no right or wrong way. This format has worked for me for years. This is a basic template. Beginners don't feel intimidated! You can do it! All those crochet hotshots you see on Instagram had to start somewhere, too.
How To Read & Write Crochet Patterns
It all starts with an idea. I’ve created a pattern format for you to follow. All you have to do is input the information.
Pattern Title
Yarn
Hook/Tools
Gauge
Notes
Body
Photos/Sketches
Yarn Label Information
Difficulty Level
Measurements
Final Thoughts
The template is in this format because before you even get to the body section and start chaining or making magic rings, you have to look at it from your customer’s point of view. There is information buyers need to know to see if the pattern is what they want.
Pattern Title:
This is what you want to call your finished crochet pattern. It can be incredibly simple or as creative as you want it to be. I've given pattern names like “Peach Pie Scarf” or something as simple as “Women's Mittens." The name isn’t set in stone. You can have a working title and change it up until you publish your pattern.
Yarn:
This one is a MUST. If you run out of yarn, you need to know the specifics. Write down the brand, color, size, and yardage of yarn. Buyers need this information.
Hooks/Tools:
Write down your hook size! You can forget or lose your hook during the design process. Always write down your hook size. Anything extra you need to use can be noted here, such as stuffing, safety eyes, etc. Buyers also need to know the hook size you used so they can get the correct gauge.
Gauge:
Gauge is used to measure both the height and width of your stitches and is usually in the format of # of stitches and # of rows = 4 inches.
Example: 6 stitches per 3 rows = 4 inches
It’s used so those who follow your pattern can have their finished product be the proper size. Not too big, not too small. The easiest way to know your gauge is to crochet a gauge swatch and measure it. A knitting gauge or measuring tape can be used as well.
Notes:
I mostly use this section to remind myself if the pattern is worked in the round or rows. I also like to jot down any crochet abbreviations and short forms that will be used.
Body:
This section is where you write down everything you do while crocheting. How you write this part is up to you, but I like to number each row/round. Always use abbreviations and other symbols to condense your crochet pattern for readers. If you’d like examples, check out the free crochet patterns I’ve designed.
Photos/Sketches:
A section to print out and attach any photos you would like to use as a reference when creating your patterns. Sometimes I’ll sketch out my crochet design before I even sit down and make it. I sketched out my Teddiursa crochet pattern beforehand for some extra inspiration!
Difficulty Level:
I like to include the difficulty level of my patterns. This is more of a courtesy than anything. I’d feel bad if a beginner crocheter purchased a pattern that is at an intermediate level. Remember that if you’ve been in the crochet game for a while, something that seems beginner-friendly to you won’t be to others. Review your pattern to determine what skill level your pattern should be.
Measurements:
Include the measurements of your finished design. Photos can be deceiving. I’ve purchased amigurumi patterns in the past with the understanding that they would be tiny. They were much bigger than I thought. If you’re designing a sweater or other garment, make sure you mention the measurements of each size.
Final Thoughts:
Is there anything you’d like to do differently or change next time? What about different sizes or colors? Maybe other techniques for shaping? This is the section for you to take note of that. Don’t include this section in your finished PDF. This is just for you.
Do you creating amazing crochet creations and want to share them with the world? How about making some money on the side with your hobby? Learn how to design and write crochet patterns with my downloadable crochet pattern template.
You’ll receive a copy of a template that can be edited in Canva as well as a plain version you can download as a PDF and print if you prefer to write your crochet designs by hand. You do not need a paid Canva membership to use and download the crochet pattern template. It can be used and edited with the free version.
Preview the Canva template here.
Download to:
✔ Make Passive Income
✔ Make Your Dreams a Reality
✔ Learn to Write Crochet Patterns
Collect your thoughts & ideas with a section for:
📝 Pattern Title
📝 Your Favorite Yarn
📝 Crochet Hooks
📝 Gauge
📝 Pattern Notes
📝 & More!
Make money with crochet today! 💲Check out my helpful blog on how to use each section for success!
Looking to go straight to selling crochet pattern PDF’s? Download my template here.
How to purchase:
✔ Click “PURCHASE”
✔ Enter Your Email
✔ Input Shipping Information
✔ Select Payment
✔ Complete Checkout
Thank you for shopping from Summerbug Crafts! 🐞
How To Sell Digital Crochet Patterns:
So, you’ve finished the rough draft of your first pattern. Now what? Turn it into a PDF that you can upload online for customers to download digitally. Download my “Sell Your Crochet Pattern PDF” Canva Template to get started!
Making A PDF:
Beginners can do everything on Microsoft Word and convert it into a PDF, but I love to use Canva. I find Canva easy to use, and you can let your personality shine by using your brand colors and the free graphics provided. Once I finish turning my rough draft into a beautiful downloadable crochet pattern, I upload it as a PDF to my online shop, Etsy, & Ravelry!
Terms & Conditions:
Your terms and conditions should state that you don’t allow your pattern to be downloaded for reselling or distribution. Add watermarks to your work or photos to protect them if you want. I always include in my terms that artists can use my crochet patterns to make and sell physical items as long as they promote me as the pattern designer. This is a way to get your crochet patterns into the world for others to find. In summary, your terms and conditions are entirely your choice, but keep them short, simple, and easy to understand.
Pricing Your Patterns:
I like to look at what others are pricing similar patterns at. This gives me a good ballpark of what my customers are willing to spend. I ultimately determine the price of my crochet patterns on the amount of work I put into them. For example, I’ll price higher depending on the length it took me to design, the difficulty level, how many photos are included, if graphs are included, etc. Pricing is up to you and what you’re comfortable with, but please respect and believe in yourself.
Refunds:
State in your title and pattern description that your product is a crochet pattern only and not a physical product. You’re still going to have buyers messaging you wondering where their physical crochet item is and if you could refund them for the pattern since it’s not what they wanted. This scenario plays out all the time which is why I have stated all over my patterns and shop that digital downloads are nonrefundable. It will happen even when you clearly label your crochet patterns as digital downloads, but stating it clearly and easily protects you. It’s the leverage you need to say no refunds.
*Etsy no longer allows refunds for digital products. They are automatically final sale.
Remember:
It is not your fault they didn’t read the description.
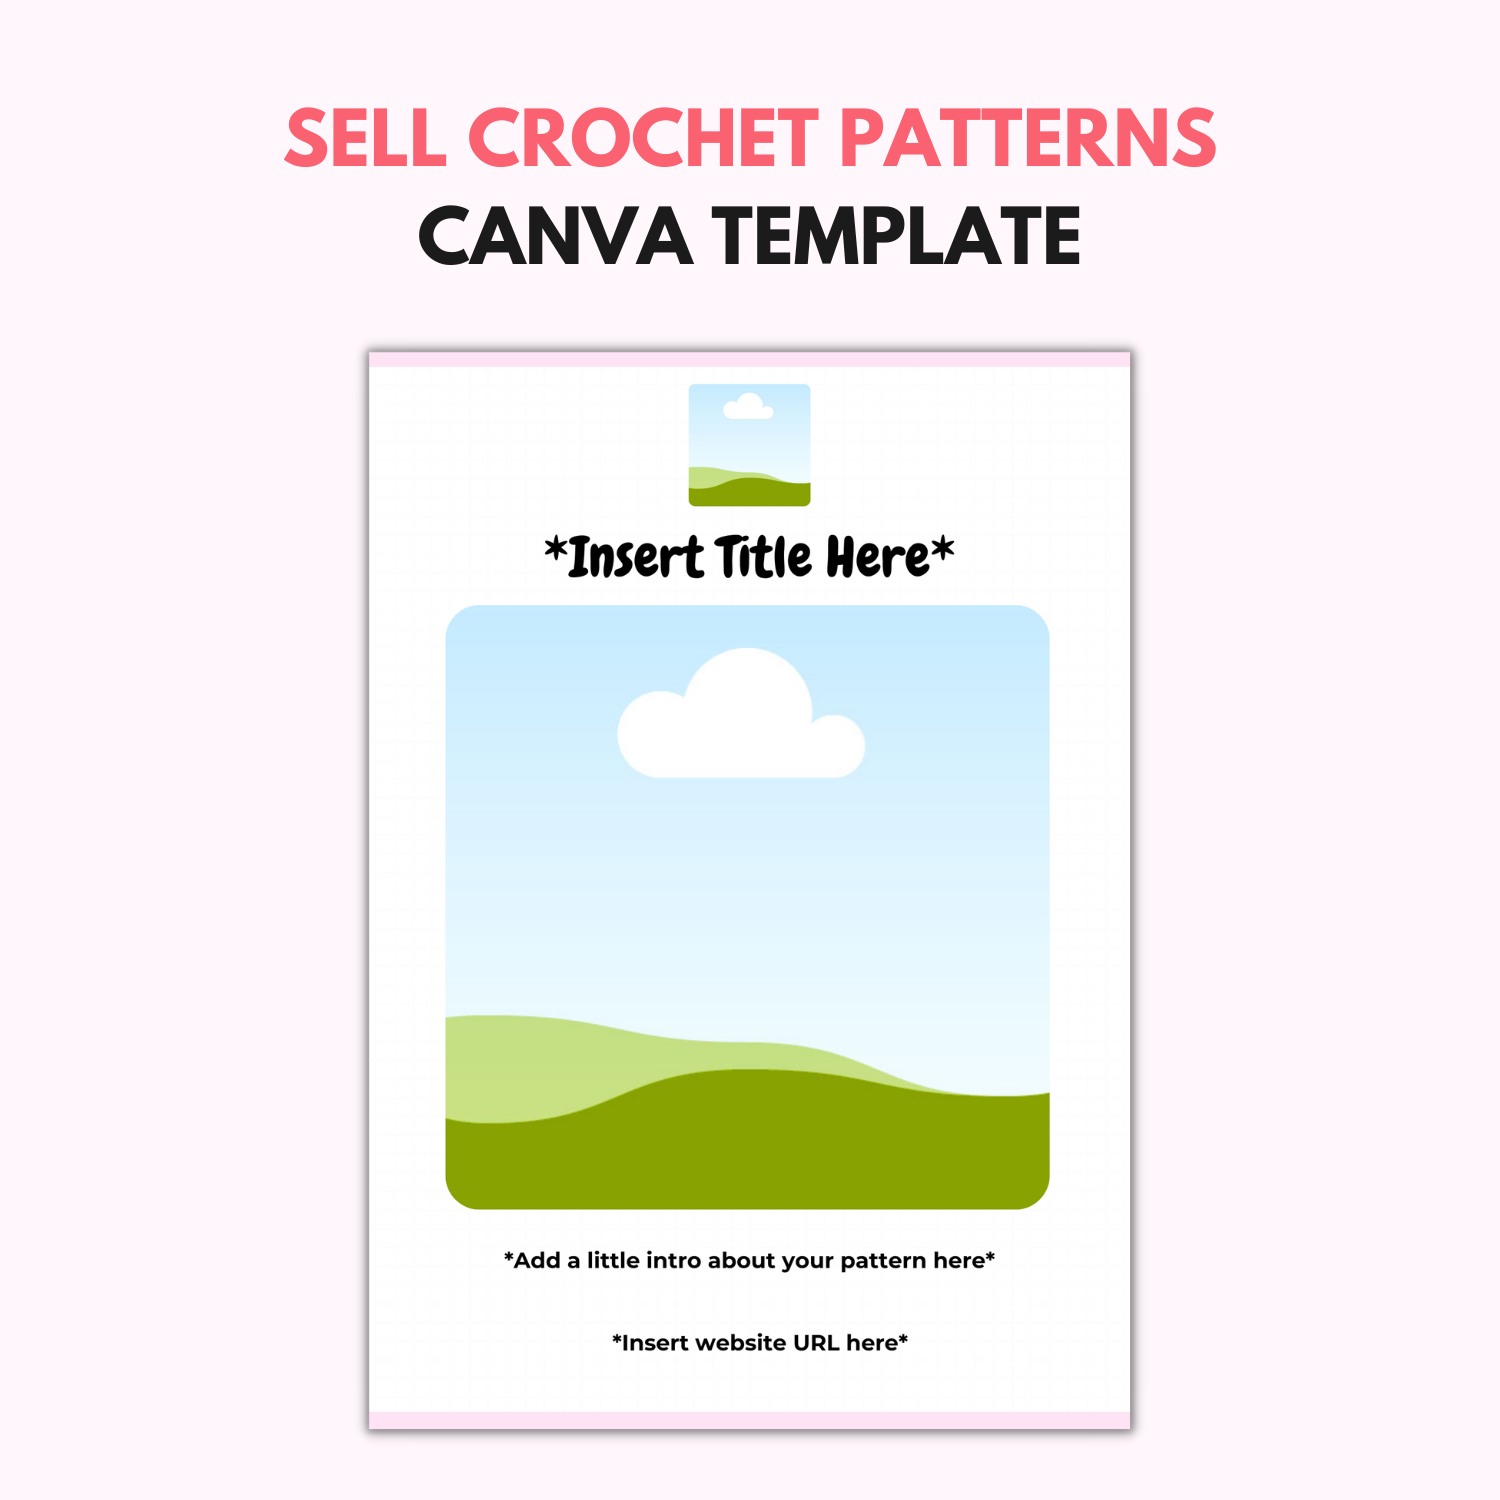
Are you interested in selling your crochet/amigurumi patterns on Etsy? If you aren’t sure where to get started when creating a PDF that you can sell and other crafters can download and use to make your crochet creations, then this Canva template is for you!
Fully customize this template to the font & colours that match your small crochet business branding. Drag & drop photos of your finished pieces onto the template into the photos frames for automatic adjusting. The READY TO SELL crochet pattern template is set up so all you have to do is enter the information needed for your pattern in the designated sections.
Included in the download is a FREE copy of my Potato Crochet Pattern that you can follow as an example, or make a cute potato amigurumi.
You’ll receive a copy of a template that can be edited in Canva. You do not need a paid Canva membership to use and download the crochet pattern template. It can be used and edited with the free version.
Preview the Canva template here.
Download to:
✔ Make Passive Income
✔ Make Your Dreams a Reality
✔ Sell Crochet Patterns on Etsy & More
Template Comes With:
📝 Fully Customizable Template For Your Brand
📝 Drag & Drop Photo Sections
📝 FREE Potato Crochet Pattern
📝 Instructions To Use Template
📝 Instructions For Downloading
📝 & More!
Make money with crochet today! 💲Upload & sell your crochet/amigurumi patterns on Etsy today! Check out my blog for more information about selling your crochet patterns.
How to purchase:
✔ Click “PURCHASE”
✔ Enter Your Email
✔ Input Shipping Information
✔ Select Payment
✔ Complete Checkout
Thank you for shopping from Summerbug Crafts! 🐞
You’ve learned how to write a crochet pattern and now you’re ready to sell. You can sell your crochet patterns as digital downloads on a variety of websites:
Etsy
Ravelry
Ribblr
Any website builder with shop capabilities
Keep in mind most of these sites have fees. It’s unavoidable when it comes to selling on a third-party site. As long as you are charging adequately, they shouldn’t bother you.
Designing and selling crochet patterns can be a way to get some passive income rolling in. Never forget that you are your customer service department and will need to answer any messages and emails you get about your crochet patterns.
If you’re worried about your designs, you can always ask your followers on Instagram or Ribblr to be pattern testers before you make the pattern public for purchase. This should work out any bugs or flaws in your design.
You Might Like…

